There are a number of flavour pairings that are deemed classics – blueberry and lemon, olive and orange, dill and cucumber, tomato and basil – however one definitely trumps all others in terms of its decadence and utter deliciousness…coffee and chocolate!
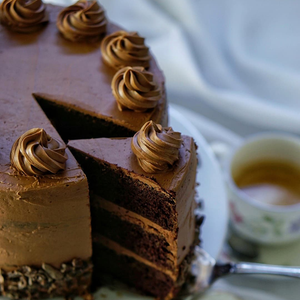
Layers of Nespresso flavoured chocolate cake mixed with the smoothest salty chocolate coffee frosting to result in the most wicked chocolate cake! Definitely a dessert for lovers of chocolate and coffee, it is a celebration cake worth trying!
Serves: 12
Ingredients
Cakes:
- 1 capsule Nespresso Ristretto (lungo extraction) (makes 250mL hot coffee)
- ¾ cups cacao powder
- 2/3 cups sour cream
- 2 2/3 cups plain (all-purpose) flour
- 2 teaspoons baking powder
- 1 teaspoon bicarbonate of soda
- Pinch of salt
- 1 ¼ cup unsalted butter, at room temperature
- 1 cup regular white sugar
- 1 cup dark brown sugar
- 4 eggs, at room temperature
- 2 teaspoons vanilla bean paste
Coffee Caramel Frosting:
- 1 cup regular white sugar
- ¼ cup water
- 1 full cup thickened cream
- 1 teaspoon vanilla extract
- ½ teaspoon sea salt flakes
- 450g dark chocolate, broken into small pieces
- 450g unsalted butter, at room temperature, cut into small cubes
- 1 capsule Nespresso Ristretto (espresso extraction)
- Cacao nibs, to decorate
Instructions
- Preheat the oven to 160C. Grease and line three 20cm pans, line the bases with non-stick baking paper and lightly grease them again.
- Combine the hot Nespresso coffee, cacao powder and sour cream in a bowl and stir to mix well. Set aside to cool.
- In another bowl sift the flour, baking powder, soda and salt. I like to sift these at least a couple of times to get as much air as possible into the mixture.
- Place the butter into the bowl of your stand mixer and, using the paddle attachment, beat the butter for 6-7 minutes on a medium speed or until light and fluffy.
- Add the sugars and beat for another 5 minutes.
- Add the eggs, one at a time, beating for about a minute between each addition. Add the vanilla and beat again for a further minute.
- Lower the speed of the stand mixer to a low speed and add half the flour mixture, then half the cooled cacao mixture, then the second half of the flour mixture and finishing with the rest of the cacao mixture. Beat until they have just combined.
- Divide the mixture between the three pans and pop in the oven to bake for about 30 minutes or until a toothpick inserted into the centre of the cakes comes out clean.
- Leave to cool completely in the tins.
- To make the coffee caramel frosting, start by making a caramel syrup. Place the white sugar and water in a medium saucepan and stir over a low heat until the sugar dissolves. Ramp up the heat to high and bring to a boil without stirring. Allow the mixture to bubble away until it becomes a deep amber colour and then remove from the heat.
- Add the cream and vanilla, taking care not to get burnt as the hot sugar syrup will dramatically bubble up when you add the cream. Add the sea salt flakes, place the saucepan back on the heat and stir for a minute or so until it is all well blended and you have a lovely caramel sauce.
- Place the chocolate in the bowl of your stand mixer and add the hot caramel sauce. Allow it to sit for a minute or so and then stir until the chocolate melts and the mixture cools down a little.
- Fit the paddle attachment on the stand mixer and add a small piece of butter, beating on a medium speed until the butter has disappeared from view. Add the rest of the butter this way, literally piece by piece, making sure to beat the mixture well after each addition to ensure it remains lovely and smooth. Halfway through the process you will notice the mixture become a little grainy. This is normal and will correct itself once more butter has been added. Be patient as this part of the process easily takes 12-15 minutes.
- Slowly drizzle in the Nespresso shot and beat for another couple of minutes until it is all blended and silky smooth.
- Place about ¾ cup of frosting in a piping bag fitted with a decorative tip (I used the Wilton 1M) and place the rest of the frosting in a large piping bag. If it is a little warm and runny, place the bag in the fridge for about 15 minutes to firm up a little.
- To assemble the cake, place the first cake on a small board on a cake turntable. Spread ¼ of the frosting in the large piping bag onto the cake. Place the second cake on top, add a further ¼ of the frosting on top, then place the final cake on top to make the three layer cake. Spread the rest of the frosting over the top and sides of the cake.
- Use a bench scraper, straight icing spatula or ruler to smooth out the sides of the cake.
- Use an offset spatula to smooth out the top of the cake. Then, using the reserved icing, pipe a ring formation of swirls on top of the cake. To finish the cake, lightly press the cacao nibs around the bottom part of the cake. Allow to rest for at least 30 minutes in a relatively cool part of the kitchen to set.
- Place the cake on its serving plate, cut into wedges and serve!